
During the weekend, I made this cinch bag that I'm planning on using as a gift bag for one of the scarves that I made. This bag is super simple to make, even with my lack of sewing abilities. I think, if you can sew a relatively straight line, you'll be in really good shape. Let's get started.
1. Cut the fabric twice the size of the bag that you want to make. For this bag, I fold the fabric up and sew the sides, so keep that in mind if you get a fabric that should be a particular direction.

2. Draw where you're going to sew. I drew a line with a fabric pencil about 3/8" from the side edge. Here's where it's a bit different tho. On the top, we're going to keep a small part of the line unsewn for the cinch string, so we need to draw it as such. I draw the line from the top to 1" down. Skip about 1/2" then continue drawing the line all the way down. Draw the same line on the other side (left and right, not front and back).
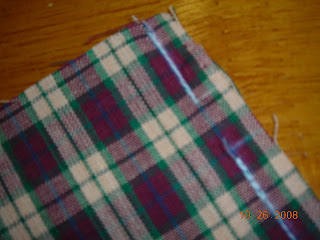
3. Sew the lines that you drew. No mystery here... we just need to sew this straight line (or as close to straight as we can get it... following the line you drew actually makes it easier to sew a straight line. yay!
4. Spread apart and press down the edge that you sewn together. It's time to bring the iron out. You just need to flatten out the top part. This isn't a necessary step, but I've learned from making an apron (I'll post that later) that it sure does help. (You also don't use nearly as many pins... which leads to less ouchies).
5. Fold down the top about an inch all the way around the bag. Iron this down as well... why not, the iron is hot, and you have it out... might as well. The bag should still be inside out at this point.

6. Sew all the way around the bag about 1/2" away from the top edge. Be careful not to sew the other side of the bag in.
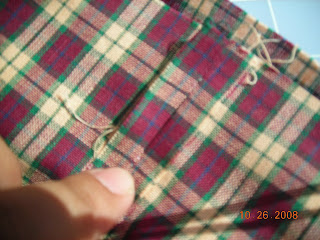
7. Invert the bag so that the outside is now outside, and obviously the inside is now inside. The bag is now done... well, for the most part. It can't be a cinch bag without the cinch string, right? The best news, however, is that the sewing part is now done. phew. Here's how the top side edge should look like. It's also where we're going to stick the string.

8. Thread the strings thru the cinch bag holes. Here, I'm using a thick and chunky yarn for string and a bobby pin to do the threading. To make the cinch bag truly cinch, it should close when you pull both sides of the string... therefore, I threaded the first string thru the first side of the bag, then through the second side of the bag, then knot the ends together. Do the same with the second string, only start with the second side of the bag.

Ta Da! You're done! Super simple... see?

No comments:
Post a Comment