Saturday, November 29, 2008

Looking Back At Thanksgiving


Thanksgiving is now done with (except for the left overs in the fridge) and the Christmas season is upon us. But before we totally leave it in the dust, a few notes for next year. :-) I've also included various pictures. Please note that the text next to the picture doesn't necessarily go with the picture. :-) I'm adding them on randomly.


Pomegranate martinis... Those were super tasty! Goes in the “must do that again” list.


Planting carrots in late August or early September will give us good carrots for Thanksgiving. Those in the picture were pulled up Thanksgiving morning. We ended up roasting a couple with the turkey innards and cooking up some gravy, and using some of them with the spinach dip appetizers that my sister made.

Delicious!


2 or 3 different appetizers worked out really well... it wasn't too much to set up and it kept people still able to eat a pretty hearty dinner.


For lox, stick to sliced baguette or bagels instead of crackers. Crackers tasted really good, but we think we may have liked the toasty yet soft texture of the bagel instead.


Wear gloves when cutting sweet potatoes. Don't know if it was because they were par-boiled or what, but once I finished cutting them my hands were a bit yellowish. A few washings had to be done to get it off... so gloves next time.


A little goes a long way with sweet potatoes. I ended up making sweet potato fries too.... why not the fryer was out. To make them, I par-boiled the potatoes, let them cool, cut into fries and fry up.


Yum!


Double the cake recipe of the roll. The pan I had was a little larger than the recipe called for, so the cake part of the roll was really really thin. Next time, double the recipe and make a bigger roll.


The frosting for it was outstanding – not too sweet, creamy and went really well with the pecans. I bet we can use the same recipe and fold in some coffee syrup for our buche du noel.


Do a really really good job of greasing the corners of the cake pan. It stuck... a lot... and with the cake being so thin, it tore away in the corner. I just cut the end result into a rectangle before rolling it up, and I got to try out the cake, so all wasn't bad.


Place fryer at a well lit place next time (or bring better lights near fryer). We place the fryer in the middle of our back lawn for safety, but that made it farther away from the patio lights. We had a small flashlight while we were doing things, but definitely need more light next time.


When frying the turkey, pull out the turkey when internal temperature is 150ish. The carry over temperature took care of the rest and it ended up being so juicy.


Next year, when letting the turkey rest, we want to try to let it rest uncovered to see if the skin stays crispier.


Leftovers will make really good turkey soup... or at least ours will. :-)


Using warmers would probably have helped with the timing.


All in all, I think Thanksgiving was a success. We had fun, hope yours was a success too.


Update [12-3-08]: This last picture shows the zucchini quiches that we added onto the appetizer list last minute because I found frozen shredded zucchini in my freezer. :-)

Update [12-5-08]: A friend just reminded me that instead of using foil and greasing it for the pumpkin roll, just use parchment paper... that stuff works wonders. I should have thought of that -- next time.

Monday, November 24, 2008

Bolo Ball Game


Several months ago, I attended a company social at a winery nearby our work site. At this social, someone brought this weird pvc contraption that looked like a ladder, then started throwing stringed golf balls towards it. To this, my reaction was... “what the... “ , but I said that with interest in mind. I was actually on my way out when I saw this, so I didn't really get to play, but it looked like fun. So, I found out what the game was called and googled it.

Bolo ball, also known as bolo golf or ladder golf, is a simple and addictive backyard game that's similar to horseshoes, if you've played that. You basically throw the bolo (2 golf balls connected by a piece of string) towards the ladder and get it to stay on one of the ladder rungs for points. I'll talk about the rules later.

Anyway, I decided that this would be a fun game to play on Thanksgiving day. I must confess that the prospect of using power tools also helped guide my decision along. :-)

For construction of the ladder you'll need:
  • 8 – 1' pieces of pvc pipe (3/4” diameter)
  • 7 – 2' pieces of pvc pipe (3/4” diameter)
  • 6 – pvc tees
  • 6 – pvc elbows
And, here's how it's laid out. I hope the image is okay. I really wanted to use google sketchup to draw it up, but apparently the learning curve to that application is longer than a half an hour, so I'll have to play with that some other time. I also considered VRML since I've programmed in it in the past, but that was 8 years ago, and I have managed to forget quite a bit. Oh well. So, you get a photographed paper & pen sketch of the layout which, I think, is actually pretty good. :-)

Okay so, make the pvc structure like the picture. As a side note, if you do a lot of pvc projects using 3/4” or ½” piping (or plan to), do yourself a favor and get the pvc pipe cutters. They're kinda pricey, but worth it as it cuts pvc pipes very easily. They'll probably have it wherever you bought the pvc pipes.

Next you have to make 6 bolos.

For each bolo you'll need:
  • 2 golf balls (total of 12 golf balls)
  • 24” nylon string 1/4” diameter (total of 6 strings)
Construction of bolos:
  1. Drill a hole thru the middle of each golf ball. I clamped the golf balls down like this to keep it from moving while I drilled in.
  2. Thread the string thru a golf ball and tie a knot close to the end of the string and another knot sandwiching the golf ball with knots at the end of the string. Now do the same on the other end of the string with the other golf ball.
  3. Use a lighter and burn the knots on the ends of each string so it melts a bit. This will help keep the knots in place. You don't want to burn off the knot so be careful with that.
  4. Now all you have to do is make 5 more.
  5. You now have to be able to distinguish team colors. I use these stickers to make team golf balls. An alternative is to mark them with different color sharpies or maybe even paint them. But stickers were available, so I used that.
    So that's all it takes to build a set. I managed to build the whole thing with things I had around the house, so the cost of the whole thing was free. Even the golf balls were collected thru walks by a nearby golf course (lots of walks, my dogs loved them).


Alright so the rules... I copied these rules from another site.

Set up
  • Set the ladders about 20 feet apart (You can adjust the distance if you would like)
  • Team 1 throws first, followed by the opponent on that same side.
  • This game can be played with 2 people or in 2 teams of 2.
    If you are playing with 2 people, you both stand at one end and toss the balls, then move to the other end for the next toss.
    If you are playing with 2 teams of 2, 1 person from each team will stand on each side.
Scoring
Top Pole = 3 Points
Middle Pole = 2 Points
Bottom Pole = 1 Points
(Feel free to adjust scoring as needed.)


Score is determined very similarly to Baggo (Cornhole, Bags), points cancel each other out. So if you score on a rung and the other team or person scores on that same rung, the points are canceled. (Example: Team 1 puts 2 lassos on top rung, it is 6 points, but team 2 puts 1 lasso on the same rung, it cancels out 3 of the 6 points.)


Play up to 21, you have to get EXACTLY 21 and points scored that would put you over 21 are deducted.


For a scoring variation
All balls that land in the base of the ladder can be scored one. The first rung can be scored 2, second rung 3, and top rung 4. This makes it a fast-moving game and works well when younger players are involved. For the one-pointers landing in the base, only one ball must be inside the area. The exception to this is a shot that lands both balls on the outside of the frame with just the rope on the inside of the ladder area. This is the only shot that counts for a point without any ball inside the base area.
Have fun playing!

Thanksgiving Update

So, I thought I'd give a brief update of what I've done for Thanksgiving during the weekend along with some pictures.

1. Grocery shopping for everything but the veggies that we need fresh.


2. Built bolo ball set. I'm hopefully going to do a post on this tonight as well.


3. Toasted the bread cubes for the stuffing.


4. Made pumpkin cookies (well, this is actually for a work potluck, so I'll be making more)


5. Started the gravlax. It has to "marinate" in a mixture of salt, sugar, pepper & dill for 48 hours.


6. Proof baked the sweet dinner rolls and threw them in the freezer.


Things are definitely shaping up. Hope yours is too. :-)

Wednesday, November 19, 2008

Planning for Thanksgiving


With Thanksgiving only one week away, it's time to seriously start panicking. Especially if dinner is at your house and you still need to clean and make the menu. If you sense a bit of panic on my part, well you're absolutely right. Ahhhh!

So, I guess the first thing that needs to be done is to decide on the menu. This will depend on how many people are coming and whether there are any dietary restrictions. Oh, and it might not be the best time to try out all new recipes... or at least a lot of them. Some are fine, but a lot of them are risky for two reason. 1. You don't know what to expect and how it's supposed to come out. Is it supposed to be that color, shape, texture? And 2. new recipes tend to take longer than we anticipate, thus throwing off your entire schedule. On the other hand, recipe websites typically have ratings and reviews that are quite reliable when the numbers of ratings/reviews are high, and you can plan to spend more time on those recipes. So... I guess, it's ultimately up to you. Just giving you some things to consider. :-)

So, back to the menu. Generally the menu will include some appetizers, the turkey, sides, and dessert. Thanksgiving usually ends up as almost an all day event in that people come early, munch and play all day then enjoy the feast. So, for all day we'll usually have nuts or chips around. Something that doesn't need refrigeration and something that can be picked at. Then we bring out the appetizers around mid-afternoon. In the past, we've gone overboard on the appetizers, making 4 or 5 different things. This was then followed by everyone being way to full to fully enjoy the turkey and sides. So, this year, I've decided to limit the appetizers to maybe 2 things. This year, we're going to have spinach dip with veggies, chips and bread, and bagel chips, cream cheese and lox. They can be prepped that morning (at least individually) and just stay in the fridge til we're ready for them.

As for the turkey, we like the crispies of the deep fried turkey, so that's what we'll be having this year. Be sure to dry the turkey up as much as possible, and make sure it's fully defrosted. I was watching a Time Warp episode on the Discovery Channel where they put a frozen turkey in the pot of hot oil, and well, let's just say... we definitely should not do that. Scary stuff! Check it out!


Anyway, once we feel like everyone is ready to eat... or almost anyway, we'll announce the lowering of the turkey. I know, it's kinda funny, but when you're about to put a 17 lb turkey whole into a vat of hot oil, it's a sight to see. Don't forget tho, to account for some time to heat up the oil. Heating up the oil will take about 45 minutes.

While the oil is heating , you can prep/cook all of the sides. I go pretty simple on sides and pick the ones that take only a little bit of time to set up then just goes into the oven. This let's you spend some time enjoying the day with your family. After all, that is the most important part of the holiday. For sides, we're going to have stuffing, garlic mashed potatoes, sweet potatoes, green bean casserole, and creamed corn as well as some dinner rolls and well... rice (just in case, I am filipino after all).


You'll want everything to be pretty much ready to go by the time the turkey is resting. That's a big tip on it's own. Never serve the turkey right after you finished cooking it (taking it out of the oven or fryer). It needs to rest for 20 to 30 minutes before you even carve into it. This allows all the juices to go back into the meat.

Last of all... Dessert. Depending on the dessert, they can usually be prepared a day or two before. I like doing this because then you don't have to worry about it at all on the day of Thanksgiving except to remember to serve it. This year we plan to make a pumpkin roll the day before and just leave it in the fridge til it's ready to serve. If I have time, I also would like to make some iced pumpkin cookies because even though you're probably full from the big huge dinner you just had, one little cookie doesn't seem like too much. :-) Also, these things go well with coffee, which would be good to combat the sleepy side-effects of turkey.

Okay, snap back to the present (just one week before the big day). Now that you've settled on a menu, you have to take into account that your guests need to be entertained. Not that watching me running frantically around the kitchen isn't entertaining... but you know. So, be sure to have something available for all of you to play. Here are some ideas.


  • Football
  • Poker
  • Game console of choice (PS2, PS3, Wii) and games (Guitar Hero :-) )
  • Karaoke
  • Board games
  • DVD trivia
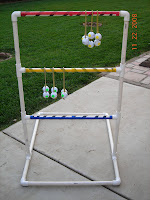
  • Bolo golf (also known as ladder golf... I'm hoping to post about this soon – stay tuned).
  • DVD movies

These are good ideas for before and after the dinner if people are still there and awake. :-)

Okay so here's the menu
Appetizers

Main

  • Deep Fried Turkey (with Creole seasoning)

Sides

Dessert


Okay so I think this is the schedule.
Weekend before
  • clean house
  • proof bake dinner rolls
  • shop for groceries if you haven't already
  • take the turkey out of the freezer and into the fridge.
  • Organize all the recipes you're going to use.


2 days before

  • make dessert
  • make gravlax

1 day before

  • make spinach dip
  • cut veggies (better yet, get baby carrots... done)
  • make croutons for stuffing and prep other things for stuffing

Morning of Thanksgiving

  • put champagne in fridge
  • buy newspaper :-)
  • set up sweet potato in slow cooker (will make the house smell great by the time the guests come)
  • check defrosting of turkey and start drying/draining
  • peel potatoes and keep in water
  • put out nuts and chips
  • last minute cleanup
  • set up games/activities
  • cut gravlax

Afternoon

  • prep the dinner table
  • prep appetizers

~ 2 hours before dinner

  • start heating up oil
  • cook all the sides

~ 1 hour before

  • cook rice
  • start cooking turkey
  • cook mashed potatoes

~ 20 minutes before dinner

  • rest turkey
  • brown dinner rolls
  • turn off slow cooker and place all the food on the table or buffet counter.
  • Give dogs their thanksgiving treat so they're busy while we eat
  • take champagne out of the fridge
  • light candles
  • and call everyone to eat

TOUCHDOWN!
Eat, Drink & be Merry!
Don't forget the desserts.

Okay good. I plan to use this schedule myself so I hope I'm not forgetting anything. :-)
Good Luck with the planning.


Update [11-24-08]: I've decided to try making my own gravy this year. Without the pan drippings this might be a bit of a challenge. So, I googled it. I found this site that has a decent description of how to go about making gravy without pan drippings. Basically, you start with chicken stock add some of the parts of the turkey that is generally unused and some choice veggies and simmer some to reduce and concentrate the flavors. Then add some red wine (yum) and some thickener like cornstarch or flour (side note: be careful with the cornstarch... a little goes a long long way). Anyway, I'll post all the results after thanksgiving. :-)
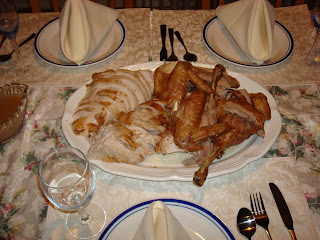
Happy Thanksgiving!!!

Sunday, November 16, 2008

Apron by Simplicity (#5154):What I Learned

Several weekends ago, I dug out this pattern that I intended to try out several years back. It's a Simplicity pattern for an apron. Anyway, my sister was over and I had the pattern out, so we figured we'd give it a shot. I'm pretty new to the whole sewing world, so I relied a lot on my sister's know-how to work on this apron. This was the first time I followed a Simplicity pattern as well, so I figured it would be a good time to write up what I learned and share it.


First things first, when you get the pattern, you have to figure out which you'll actually need as sometimes the envelop that holds the pattern also holds patterns for other variations of aprons. In this envelop, there were two patterns called Apron A and Apron B and I picked Apron A.


Second tip, have an iron handy... it helped a great deal. :-)
Okay, so here's what I did.

  1. Take out your pattern and your instructions. Don't get too intimidated with the instructions as two-thirds of it is probably repeated information in different languages.
  2. Cut the pieces out of your pattern. Another nice thing about using a pattern is that the cut-up pieces already take into account any seam allowances that you might need. All the pieces are numbered and depending on which pattern (Apron A or Apron B) you're making, the instructions list the pieces you will need. You can choose to just cut only those out or to cut all pieces out and sort later.
  3. Pin the cut out pieces to the fabric. Check the instructions as they will usually have a suggested layout of how to place the pieces onto the fabric to use the fabric more efficiently. Third tip, keep an eye on the layout in the instructions as they sometimes require a folded side, or where the selvage might be located. Fourth tip, sometimes you won't be able to use the suggested layout because of your fabric choice, such as if the pattern is directional. In this case, you'll see diagrams with the pattern pieces laid out and the direction that they'll need to be cut.
  4. Cut the fabric, then mark the fabric on the wrong side, with markings on the pattern. I use a fabric pencil to mark the circles I see. Speaking of wrong side of the fabric leads me to the fifth tip. Fifth tip, when reading the diagrams check the legends on each page to see which are the wrong sides of the fabric (sometimes represented as a shaded region or a non-shaded region) and which are the right sides of the fabric. We noticed that this actually changed from the first page to the second page of the instructions so keep an eye on that. Grr!
  5. After this, you basically just keep on following the pattern according to the instructions.

Some terms defined in my words:

seam allowances – the area between the edge of the fabric and the sewing line
right/wrong side – some fabrics have a pattern on one side this would be considered the right side of the fabric. The other side, is considered the wrong side.
hand-baste – this means to loosely sew by hand, in order for you to “transfer” the line that you're sewing to the other side of the fabric. It helps to hand-baste with a brightly colored thread that stands out against the fabric's pattern.
press – to iron down.

So, that's all I know so far about using a pattern to sew something. It was pretty fun, and actually not too badly difficult to do, so I'll definitely try another pattern again. Maybe a fleece beanie with ear flaps. :-D

Anyway, good luck, hope it helps!

Thursday, November 13, 2008

Origami Iris - Revisiting an Iris Lei


So, some time ago, a friend of mine asked me if it was possible to string up the origami irises and create a lei with them. I think I said, "probably... let's try it". After we made a couple dozen origami irises, she took it home and tried it out. It turns out that the origami irises kept on fitting inside of each other making it seem like you need a whole lot more irises to make the lei.
So, recently, I decided to revisit the idea and make several on my own. I got lazy and stopped after about 9 irises, but I do believe it's possible. The trick is to put small cut pieces of straw (the kind you'd get from a fast food place, use clear in case it's visible) in between each flower. Here are pictures of my 9 strung up as the bottom part of a lei and just hanging. It looks pretty cool just hanging - not sure what to use it for tho. As a lei, I would definitely curl the petals instead of folding them down as I show in the picture. There's at least potential for something more in here. :-)

Sunday, November 9, 2008

Loom Knit Slipper Socks


In one of my loom knitting booklets, there are instructions for making a Christmas stocking using a knifty knitter loom. Unfortunately, I misplaced that booklet. :-( Ever since I saw that tho, I've wanted to make some slipper socks for walking around the house in the winter time. I had wanted to make these since I made the scarves, but thanks to California weather just getting cold now (entirely grateful for that... really) I wasn't quite ready to put on such warm socks. Now that the weather is 65 Hi/46 Lo, it's about time to get ready with the socks. (Did I mention that I love California weather?)

Anyway, I went in search for the pattern by of course googling it. :-) That lead me to this really awesome website that had a list of lots of free loom knitting patterns,


and amongst them I found the pattern for these socks.


I followed the steps on this site and figured out a few tips along the way. I chose to hold 2 yarns at the same time for the thickness and to add a bit of tightness to the socks. (The website says that you can try using a garter stitch, but I haven't tried that yet).


So, here's how I made them...
  1. Start with just casting onto the small blue knifty knitter. Then knit on 10 rows. These 10 rows are going to be to form the cuff. If you were making a beanie it would be the brim. :-). To make the brim, reach into the loom, grab the first of the 10 rows, and place them onto the pegs. Now that you have two loops on the peg, knit off. (note: you didn't cast on)

  2. Once you have a cuff, knit another 5 rows (or more if you want a longer sock.. or if you want to make a stocking :-))
  3. These next parts are the trickiest parts of the whole thing. (Don't worry, it's actually not too bad). In the next steps you'll only be working with pegs 1-12 where peg 1 is the first peg you'd cast on. In the next 4 rows, you're going to go back and forth from pegs 1 thru 12. On the turning peg you'll only have one loop. If you look at the picture, you'll see that peg 12 has only one yarn loop on it, and how you'd do a reverse e to loop on peg 11. (BTW, sorry about the picture quality... my camera doesn't like me sometimes). At the end of the 4 rows you should be at peg 1.

  4. Tricky part is almost over – hang in there. This next part is needed so you don't have gaping holes on the sides of the ankles of your socks. We need to decrease the knitting on pegs 1 thru 12 to fill only pegs 4 thru 9. The next 6 rows will take care of this. On the first row, before you cast on, we're going to get rid of the loop on peg 12 by putting that loop on peg 11. Important: The two loops now on peg 11 will act as one loop. Cast on to knit onto pegs 1-11, and knit off. You should now have a free/empty peg 12. Now we'll do the same thing with peg 1, by moving the loop on peg 1 to peg 2, then knitting from peg 11 – 2, leaving a free/empty peg 1. Get the idea? So, we'll do the same thing back and forth til you have 3 free/empty pegs on both sides of the pegs we are working with (1-3 and 10-12 should be free).


  5. Once you have those empty pegs we need to fill them. To correspond with those pegs, there are some loops that look like they need a home. Let's take them home. Find the loops and place them on the pegs. Once all the pegs are filled, cast on and knit off, remember that you're starting from peg 4 now. I went ahead and casted on til I reached the original peg 1. Knitted off all the cast ons.

  6. So, we will now once again be on the original peg 1. Phew, the hard part is over. Congrats for that. Quick tip here: Put a safety pin or in my case a paperclip on the line that connects the last peg knit to the peg just before that. (See picture). This will give us an idea of how many rows we did so we can make the second sock the same length (I know, I'm brilliant ;-) ). Knit the rows til you reach the desired length. I grabbed my sock and put it next to the knitting ankle to ankle and went from there.
    In counting the rows, you'll notice something that looks like a ladder above the paperclip. Basically, you'll count the rungs to the top including the one that the paperclip is on. So, this one has 5 rows on it.

7. Once you've reached the desired length, finish off via the gather method (just like the beanie – which will be my next knifty knitter project posted). Before you finish off tho, count all of the knits from the paperclip to the finish and record, so you know how many rows to do for the second sock. To finish off using the gather method, you'll need the needle that came with the knifty knitter (or in my case a bobby pin – I can't find my needle). Cut the yarn about 5 inches or so from the last peg knitted. Then cut a piece of yarn (or two if you were holding two yarns) to the length of about 1 1/2 times around the loom. Thread the yarn onto your needle or bobby pin and place the loops of the peg from the peg thru the needle. I think it's neater to go the same direction on each peg (coming from the left on the bottom of the peg to the top). Once all of these loops are off the pegs (yay!), carefully invert the sock, inside out. Of the loose yarns, you'll have the following: 1 that ended the from the loom (let's call it line 1), and the 2 ends of the yarn that were threaded onto the needle (let's call these line 2 and 3). Tie knots with line 1 and the second closest yarn (2 or 3). Then pull the other yarn so that the end gathers together (Gather method), and tie more knots (2 with 3 and 1 with 3). On the last, double tie then cut yarn about a half inch from the knots. (It shouldn't come off, and no need to hide it, it's in the sock). Revert the sock back so that out is out and in is in. Don't forget to remove the paperclip.

8. You're done! Try on your sock if you'd like. As a bit of warning, it's a slipper sock, so it will feel really loose. I wear them with regular socks inside... it keeps my socks cleaner. If that doesn't satisfy you, you thread in an elastic garter into the cuff and tie it off. Enjoy your slipper socks.

Tuesday, November 4, 2008

Origami Iris


The origami iris is both beautiful and also easy to learn. For this origami you can use pretty much any paper that’s cut into a square. For the iris in the picture I actually used wrapping paper that I cut into small squares. Some wrapping paper (in this case, Hallmark) even have a guide in the back that have the squares... makes it easy to see where to cut. One thing I’ve noticed tho, is when I use this paper as oppose to the origami paper, it’s hard to curl the paper in the end. I found the plans to this online.
http://dev.origami.com/images_pdf/trad_page2.pdf

The rest of the database is also cool.
http://dev.origami.com/diagram.cfm

The pictures are done pretty well in the pdf diagram. Just watch out for the valley folds and the mountain folds. Long dashes are valley folds ( you fold in to make a valley), and the lines with the long and short dashes are mountain folds (you fold out to make a mountain). I recommend trying out the diagram and taking a look at my pictures for additional guidance.

Here are the pictures I took along the way.


Once you’ve made your iris, you can either roll the petals with a round object like a pen or you can fold it down as the diagram shows. When using wrapping paper, it might be easier to just fold it down, as I had some trouble getting the curl to stick. (I did contemplate on trying to use a curling iron, but I was too lazy to get it and try it. If someone does try it, let me know how it goes).

Now that you have a beautiful iris, you can use floral stems and floral tape (buy it at any craft stores, or any place that sells flower arrangement stuff (I bought mine from Walmart, then found out they had them at the dollar store... doh). The floral stems I’ve seen always seem to be a bit too long, so I usually cut it in half (maybe 1 foot in length).


I use pliers or sometimes just my fingers to bend down about half an inch of one side of the wire as shown in the picture. I’ll take the non bent side of the wire and stick it in the iris and poke it out thru the point in the bottom of the iris. Pull the wire all the way til the bent part catches in the iris.


Now you’ll want to cut a piece of the floral tape ( I use 3/8" width tape). A couple of inches should do unless you’re making a pretty big iris, then you may need bigger. Floral tape is really cool to work with because it sorta mends together without any sticky adhesive. You wrap it around the base of the flower where the wire and flower meet, then you kinda squeeze and roll where the floral tape is wrapped, which will help it sorta stick together.

Group several together to make a bouquet of the origami irises like the one shown on the very top of this post.