Tuesday, September 22, 2009

Loom Knit Beanies with a Visor


A long time ago, I saw a knitted beanie with a visor featured on one of the RSS feeds I subscribe to. I thought I starred it, but I can't find it. Oh well. Anyway, I ended up googling it and I found that a lot of people were looking for it too. Also, the ones I did find, seemed to be for regular knitting, of which I haven't really gotten a hang of. So, I decided to get the general concept and make my own with a loom.

Here's how I did it.

Materials and tools:

- Knifty Knitter Round Loom (whatever size you want, tho my template was only tested on the green one)
- Yarn (I like the thick wool ease ones)
- This template
- dense cardboard (like the one you find in the back of a notebook)

1. Print out the template and cut it out, then draw that shape onto the notebook cardboard and cut that out.

2. Begin creating the hat just like a regular beanie. Here's a link to a previous post, where I explain how it's done.  Continue til you're going to fold up the brim (just before Step #6.)  The length of step 5 will depend on how wide the template.  The template's width is about 1.5" so you'll want the brim (pre-folded) to be a bit larger than 3" (the additional length is to accommodate for the fold).

3.  Fold up half of the brim, and place the cut out template on the unfolded half.  Continue folding the brim with the cutout within the folded brim.

4.  Continue making the hat following the rest of the directions from the previous post.


5.  Once you've finished off closing the hat, the last thing to do is to slowly turn the brim so that the big curve is on the bottom edge of the brim.

Easy, isn't it? 

Reference: Easy Loom Knit Beanies

Saturday, September 12, 2009

Crockpot Tomato Sauce


This year was a good year for cherry tomatoes in the garden. Unfortunately, not much of the other tomatoes grew, so I had a plethora of cherry tomatoes and not much else. Ugh! Anyway, I could only give away and eat so many, so naturally I began thinking of ways to preserve the tomatoes so we can enjoy the goodness during the off season. I decided to give a crockpot tomato sauce recipe a try. (Well, I didn't really follow a recipe but I think it turned out okay). Don't forget to rinse your tomatoes.

With most tomato sauce recipes, they tell you to go thru the process of seeding and skinning the tomatoes. No way, was I about to do that to a million cherry tomatoes. So, I pretty much figured, the seeds don't really bother me, especially with cherry tomatoes because they're usually so small and the skin so thin... So, I just threw it all in the blender and bzzzzz. If you want to limit some of the skin and seeds you can definitely put it a couple of layers of cheese cloth. It may take a while to drain.


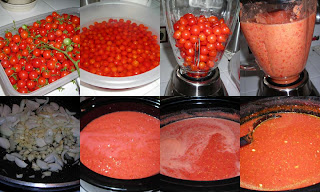
Once it's all blended up, pour the whole thing into the crockpot, add in whatever ingredients you want to use within your tomato sauce. I sauted some garlic and onions, and threw it in. In previous sauces I've added in other fresh herbs like basil, parsley, oregano, chives, and a some thyme along with the onion and garlic and even a couple of tablespoons of sugar.

Turn on the crockpot onto low and let it go for 5 to 6 hours. I also stirred occasionally to make sure nothing was sticking in the bottom, and to check the thickness. Once those 5 to 6 hours are up or the sauce gets to as thick as you want it you can now choose how you want to store it. (if you like your sauce to be somewhat thicker like marinara, you can optionally put in a small can of tomato paste -- I read somewhere that you loose some flavor the longer you cook tomatoes. Never noticed it, but thought I'd mention it.

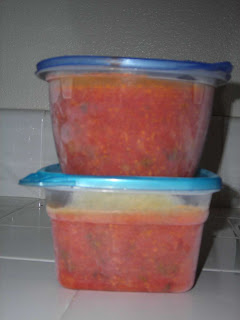
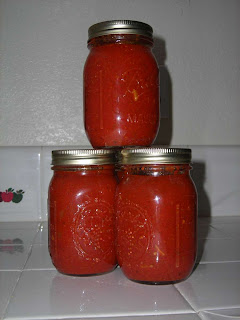
In storing the sauce, you have two good options. One is to freeze it. Place the sauce in a freezer suitable container and put it in the freezer. Give enough room to account for expanding liquid. The second option is to can the sauce. I forgot to take pictures thru the process of canning, but we used a pressure cooker canner. Put a tsp of lemon juice in each jar before you put the sauce in. Next, place 2 inches of water in the canner, and bring to a boil, Then place the jars in (on a rack) the canner and close up. I believe we processed the cans for 25 minutes taking an average of all the times we saw online. Don't forget that the processing begins when the cooker is pressurized (or the weight on top begins to rock). Once the 25 minutes are done, just turn off the stove and walk away. You want the cooker to release the pressure slowly as it goes back to room temperature. I left it alone and opened it up the next morning, but I was also doing the canning close to 11 at night.

And there you have it... Crockpot tomato sauce for your use throughout the rest of the year. We use it for several things such as pasta sauce, pizza sauce, and marinara sauce. Usually, we will add some tomato paste to it at this point, which is why I didn't bother putting it in during the crockpot cooking.

 [Update 10/13/2009: I just found another recipe for slow cooker tomato sauce.  ]

Sunday, September 6, 2009

DIY TV or Monitor Stand


I saw this on a post a good while ago, I think via IkeaHacker. Anyway, I needed a solution to place my monitor on and still have a place to put my keyboard when I'm not using it. My computer desk = my sewing table. I wanted a quick solution that also looked cool, so this solution turned out to be perfect and super easy, and did I mention cheap, way to do it. Here's how I did it.


Materials:
- pine wood (any wood should work as long as it's about 3/4 inch thick -- shelf wood works well)
- 4 door stoppers (the non coily types).


1. Cut the pine wood to whatever size you need. I wouldn't recommend making these shelves too long, as the middle area will not be adequately supported.

2. Sand down the edges and corners of the wood, it's just nicer that way.

3. Measure an inch in on both sides of each corner of the wood and mark it with a pen, or in my case, a crayon.

4. Screw on the door stopper onto the mark on each corner of the wood.


That's it. I told you it was simple. To fancy it up, you can easily have painted or stained the wood before screwing on the door stopper "legs." The best part is, it's just the right height for the keyboard to slip under and, as you see in the picture, for my dvd player to fit under. Another good thing about it is that the whole contraption is also quite cheap to make. each door stopper was only $1.50 and the whole piece of pine was about $5 of which I used the one piece for both the tv stand and the monitor stand. Woohoo!

The above picture shows my monitor stand, and the below pictures show my TV stand. :-)

Friday, September 4, 2009

Homemade Plantain Chips


Plantains are a type of banana that is generally eaten cooked. I just recently attempted to prepare them as chips after tasting a bag of plantain chips. These crunchy goodies are a very tasty snack and a cinch to prepare. For these chips I use green plantains. I tried yellow plantains and it came out sweeter but it did not crisp. I think yellow (ripe) plantains would taste good pan fried with a bit of sugar for glaze... might have to try that sometime. Okay let's get cookin'.

Ingredients

- Plantain bananas (green)
- Oil (for frying)

1. Start heating up the oil. I set my fryer to 375 F and worked great.

2. Try peeling the bananas. If you have trouble use a knife to peel off the skin. Technically you can keep the peel on but I find that it gives the chips a bitter taste that I don't really like.

3. Slice the bananas really really thin... Use a mandolin slicer set to as thin a setting as you can make it (mine went down to 0.3mm, I think). You'll find that one plantain makes a good amount of chips.

4. Drop the banana slices into the fryer a slice at a time so they don't stick together. You'll want to do them in small batches so they still cook in relatively the same amount of time.


5. Place newly fried chips on some paper towels to drain and sprinkle with salt. (I hear garlic on them is excellent, but haven't tried that yet).

6. Enjoy the chips.