I just created a flickr group for Rad Linc Crafts. If you'd like to share your Rad Linc Craft inspired creations, I'd love to help you share them. Join and add photos to the flickr group today, I can't wait to see your creations.
http://www.flickr.com/groups/radlinccrafts/
Tuesday, April 27, 2010
Sunday, April 18, 2010
Plantable Cards

In celebration of Earth Day later this week, I thought I'd share this project with you guys. This is a plantable greeting card. It's made with used paper, blended to a pulp, with seeds embedded. The idea is when you give a card to someone, that person can plant the card and get flowers in the near future. I bet they would make good gift tags as well.
So here's how to make them.
Materials:
white paper, the more print ink you have on it, the darker gray it is
hot water
seeds
embroidery hoop
screen or tulle fabric
cardboard reverse cut-out of the shape you want.
foil
spatula or something similar to spread
towels for drying.
How to:

1. Tear the paper into small bits. I tore them to about 1 inch squares.
2. Place paper bits in a blender. Add hot water (enough to cover the water) and blend til it's somewhat smooth pulp.
3. Remove the pulp from a blender, let mixture cool down to room temperature, and stir in the seeds. (I used a full packet of California Golden Poppies). The ratio of paper to seed really depends on how dispersed you want the seeds.
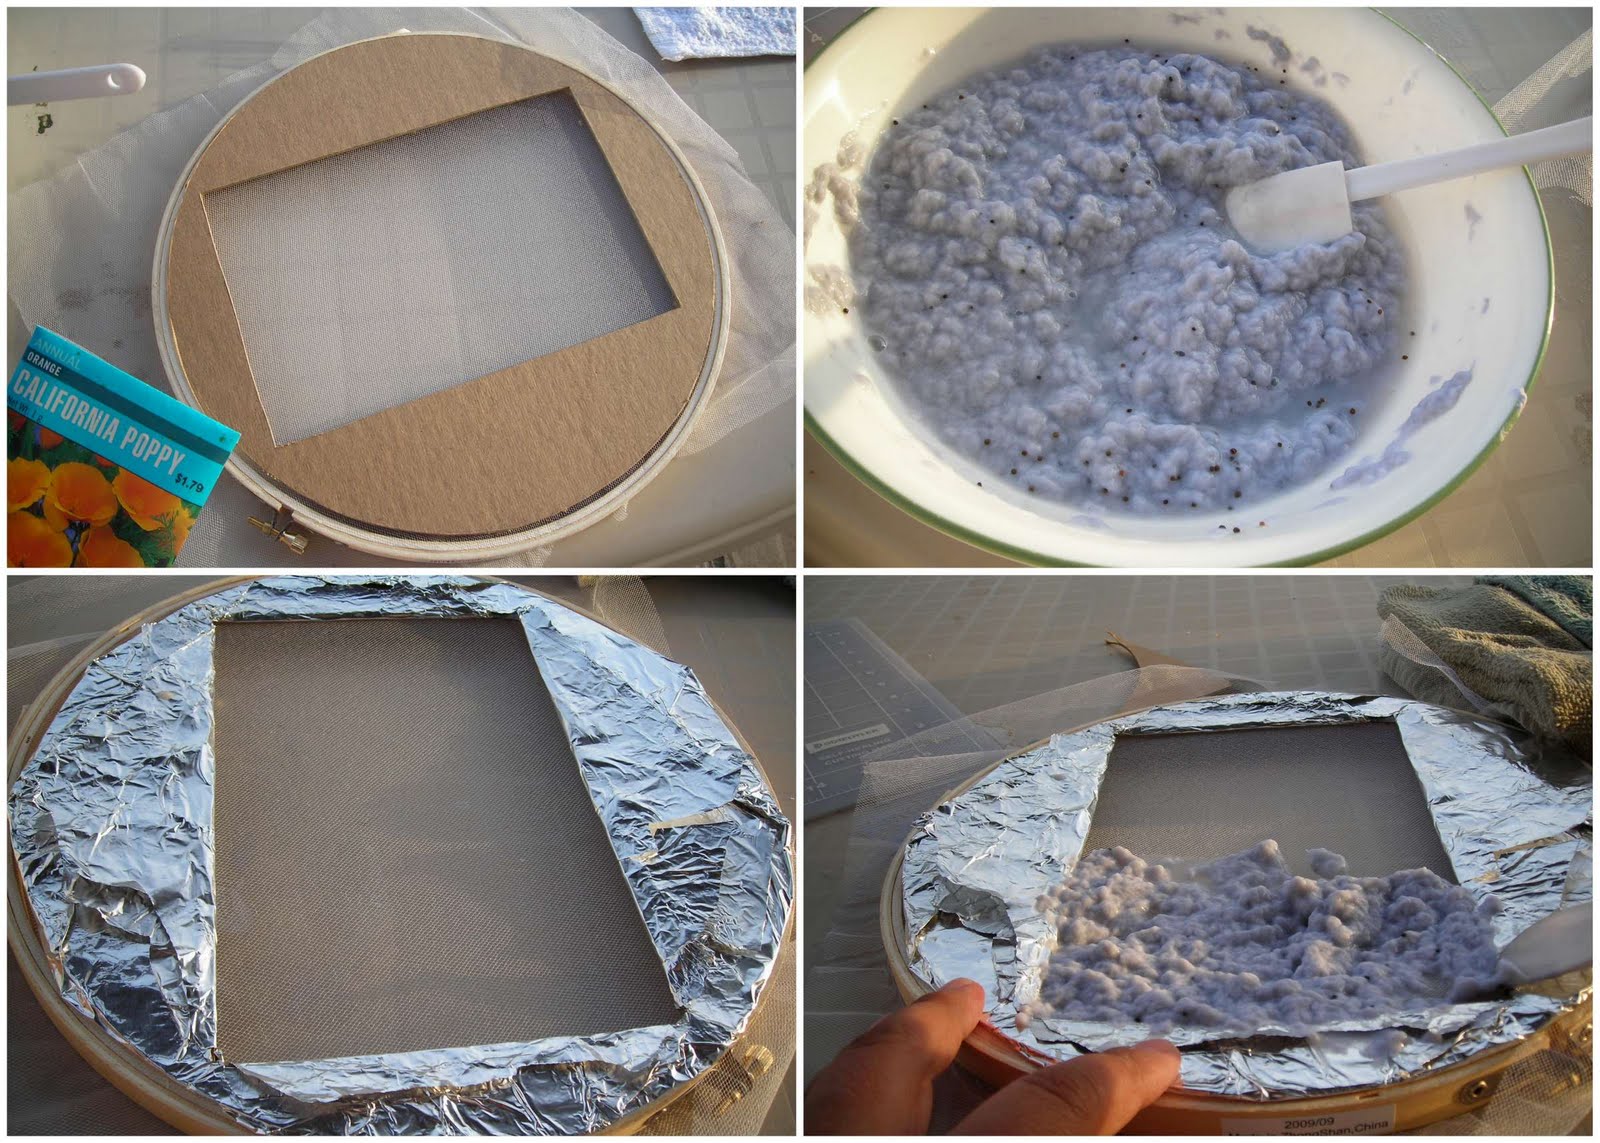
4. Take your cardboard and wrap it in foil. Stretch the tulle or screen on the embroidery hoop so it's taut. Place the foil wrapped cardboard shape on top of the embroidery hoop. You're now ready to add the pulp and start making the paper.
5. Place a towel under the embroidery hoop and screen. Start spreading the pulp mixture into the card cut out. Use the spatula to lay the pulp mixture evenly.

6. Remove the cardboard top, and place a towel on top and press down gently.
7. Transfer onto the towel by turning over onto the towel, and peeling away the embroidery loop. Place a dry folded towel on top and press down (be sure you're on a flat surface).Let dry on the towel for a full day, or until it's completely dry. Once it's half dry, if you want to transfer it to a dryer towel, feel free to do so.

8. After it's fully dry, carefully fold the paper into a card, and begin to decorate it. I chose to use simple colored pencils to draw a picture of the flower that the seed represents. The paper can be planted just like regular seeds. Just place it on the ground with a layer of dirt. The card can also be cut into pieces and planted in different locations.
I placed a small piece of the seed paper on top of a sponge in a small saucer with water, so I can take a picture of the seeds sprouting.

That's it. Enjoy giving out your card.
Happy Earth Day! Remember to Reduce, Reuse and Recycle.
Tuesday, April 6, 2010
Quick Post: Giveaway Finds
Looking thru my Google Reader this morning, I found a couple of giveaways and I wanted to share them.

The first one is from a craft blog called Chica and Jo. If you've ever checked out the blog links that I read, you have probably noticed Chica and Jo. These ladies have such wonderful ideas on their blog. You should totally check them out. They just designed a cool craft green t-shirt, and they're giving one away. All you have to do is comment how you craft green on their blog post before April 13th.

The second one is from a book review blog that I've started following a while ago. The blog is called Sharon's Garden of Book Reviews. On occasion, I randomly find blogs. Well, I ran into this one just as she was reviewing a crochet mystery series. It peaked my interest that I started reading the books and enjoyed them. They're easy going cozy mysteries. Before I read Sharon's Garden of Book Reviews, I have to admit that I've never even known that there was a genre called cozy mysteries. I'm sure glad I found that little tid bit out. I was even more thrilled when I found out about her giveaway of cozy mystery books. Yay! To enter, leave a comment in her blog by April 18th. For more details on other ways to enter check out her post.
By the way, the Crochet Mystery Series are by Betty Hechtman.
Friday, April 2, 2010
Worms and Gardening, Part 2

Making your own Worm Bin
In part 1 of Worms and Gardening, we talked about what vermiculture was and how beneficial it is to use worm compost in the garden. If you missed it, check out the post here. There are also a few links on the bottom of the post to get additional information about vermiculture. So, now that you know all about worm composting, this post will show you how to set up your own worm poo making factory. :)
This is a great setup for someone limited with space, just want a small factory, or just want to try things out for starters.
What you need:
2 plastic bins (with lids) -- Make sure to get non clear ones.
material for bedding -- I used an old phonebook.
handful of soil
red wigglers (also known as red worms)
food for your worms
Subscribe to:
Posts (Atom)