
Here is another easy friendship bracelet to do. It's on of the first bracelets I learned to make because of it's simplicity as it consists of using one string to tie a knot around all the others in the bunch. A bunch consist of however many colors you want to include in the bracelet.
Here's how it's done.
Material:
DMC floss -- as many colors/strings as you want.
Holder: Cardboard and binder clip (or clipboard)
*Note: The length of the floss will vary depending on the length of the bracelet and the amount of strings you want to use. A yard should work as a good starting point. You can adjust length on the next bracelet. :)
How To:
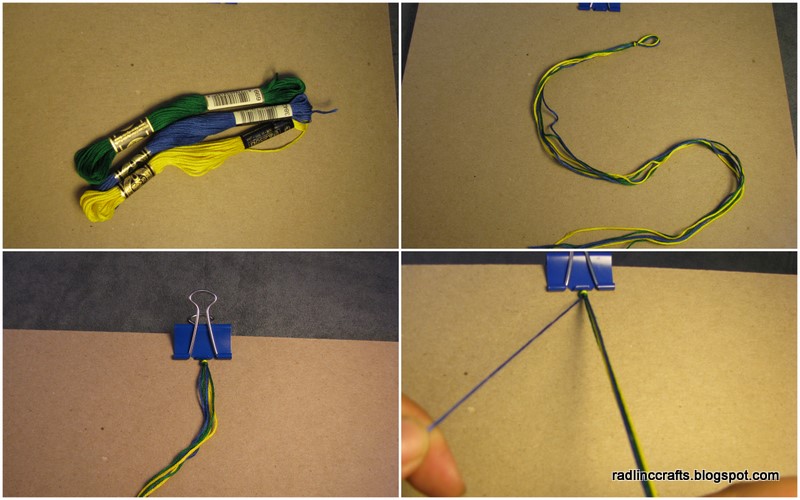
1. Hold all of the strings together and tie a knot near the top. If you chose to make a bracelet with a few colors you'll probably want to double the length, fold it in half and make a knot near the fold like shown.
2. Clip the bracelet to the cardboard with the binder clip just above the knot.
3. Separate the a string of the first color you want to use. Holding everything aside from the separated string, tie a knot using the separated string around the bunch.
4. Continue to make knots using the separated string around the same bunch until you've reached the desired length for that color. If you make all the knots the same way, you'll notice that the knots will form a twist around the bunch, a bit like a spiral staircase.

5. When you're ready to switch to another color, grab the next color you want to use and let the previous color rejoin the bunch. You can now start making knots again. Watch where the knot bump is landing, try to position it so that the spiral staircase continues unbroken.
6. Repeat steps 4 and 5 until the desired length of bracelet is reached.
*Note: Step 7 is only really useful if you folded the strings in half to make a top loop in Step 1.
7. Once the bracelet length has been reached, put the whole bunch together and divide the strings evenly into two. Here, I braided each divided grouping for about 1.5", tied a knot in the end and cut the excess string. These braids are what is used for tying the bracelet (only works if you made a loop on top).

Enjoy making these easy bracelets.
1 comment:
Very cute! Thanks:)
Post a Comment