
Note: Since there is so much info in here, I'm splitting this post into two. Part 1 will be setting up the bin dough. Part 2 will be baking the baguette.
We've tried a several baguette recipes, and while they were tasty, the texture and density just didn't seem right. We tried several tricks to get it right, like throwing ice cubes in the oven during the beginning of baking time. That helped, but it still wasn't quite there. Getting the crust right was a matter of getting the right amount of steam into the oven, which with a regular oven wasn't an easy task. And as for the density, we were at a lost. We had found another no knead bread recipe the required a dutch oven. It was a great recipe with fantastic outcomes, but you had to start the dough like 12 hours ahead of time, and it wasn't a baguette.
Then we tried this one. Since then, we've had a bin of dough in our fridge ready to go. The dough lasts about 2 weeks, which is about how long it takes us to go thru the bin, so all good. The bin makes about 12-14 baguettes, I think.
So first, let's go thru the setup of the bin dough. So, you'll need a bin of some sort. Do not use an airtight bin. Actually not sure why (probably has to do with the expanding gases). I use a 16 qt clear plastic bin. Clear plastic is nice because you can see the bubbles thru when the dough rises.

The basic ingredients are as follows:
6 cups of water
3 tbsp yeast
3 tbsp salt
13 cups flour (all purpose)
I actually wrote that on a strip of tape and stuck it on the bin. I also added another strip of tape where I wrote the date of the mix.
Okay, so I like to start out with adding the water to the bin first.


I add a couple of cups of flour next (3 is a good number).

I use a whisk to stir in the beginning.

Then I add the yeast and salt


Then I add the rest of the flour around 3 cups at a time, while mixing in between. Probably after the 6th cup you'll want to switch from a whisk to a big spoon to mix the dough.
This recipe will give you a wet dough. I think this is also key to success as will help add more steam when baking... and better yet, more incorporated thru the dough.

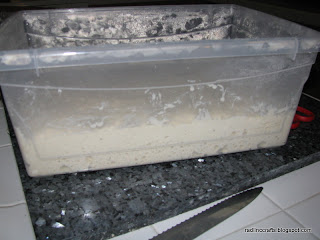
When the dough is throughly mixed (no more dry areas), set the bin aside (in room temperature) for a few hours. You'll notice that after a few hours it will have already started rising. Picture below is after about 1 hour.

Afterwards, store the bin in the fridge. The bad news is, it'll take up permanent residency in your fridge. The good news, is fresh baked baguettes will be only about an hour and a half away (technically it could be less).
Once you've used all your dough and you're ready to make more, the beauty of it is that you can just start putting the ingredients in. As in, you don't even have to wash the bin. The remaining dough in the bin actually acts as a starter to help activate the yeast and the rising of the dough. If that bugs you, then by all means go ahead and wash the bin. :)
According to the book, the dough is better after a full day in the fridge and gets better and better afterwards. So, we usually wait a full day to make more bread, as for getting better day after day, the differences aren't hugely noticeable to me (but that might just be me).
Stay tuned for the next post on baking the bread.
No comments:
Post a Comment